Difference between revisions of "Advanced Guide"
| Line 674: | Line 674: | ||
There are two possible paths in this tree for the right side, taking the upper path as shown or taking the lower path. They both result in the same ultimate goal (60 multi), but the paths there are vastly different in value. The path shown consists entirely of small nodes, which provide cast speed (which can help dpt) and int (which always helps dpt), while the alternate path includes a big node, but only provides mana regen and max mana, which does not serve to help dpt and only provides a cushion of max mana to allow lower dpt owls to cast more rotations of their runes before running out of mana. | There are two possible paths in this tree for the right side, taking the upper path as shown or taking the lower path. They both result in the same ultimate goal (60 multi), but the paths there are vastly different in value. The path shown consists entirely of small nodes, which provide cast speed (which can help dpt) and int (which always helps dpt), while the alternate path includes a big node, but only provides mana regen and max mana, which does not serve to help dpt and only provides a cushion of max mana to allow lower dpt owls to cast more rotations of their runes before running out of mana. | ||
| + | |||
| + | == Advanced Levelling Guide == | ||
| + | |||
| + | When levelling additional characters to 20, the experience can be made much easier through proper itemization and decision making. | ||
| + | |||
| + | === Itemization === | ||
| + | In order to maximize the rate of xp gain, it is important to be able to complete quests as quickly and often as possible. The most common quest types are ones asking to loot specific categories of items (purveyor quests), so to facilitate this it is important to have as much item quant as possible. This can be done either by setting up quant items on a levelling build or by having another player using a quant build take the last hit on every enemy. | ||
| + | |||
| + | Occasionally, there will be quests asking for magic [[Loot|quality]] equipment of a specific categories or asking for any rare quality equipment. In order to facilitate this, some item quality helps immensely. You can do this again by putting it onto the levelling build itself, having an external player with it, or by killing or assisting in the killing of bosses such as [[Stinktooth]] or [[Radulos]], which are guaranteed to drop several higher rarity items. | ||
| + | |||
| + | === Decision Making === | ||
| + | Before you start picking up your loot drops, you should ask yourself if it helps you complete your current quest. For example, if you are in sewers and have a quest to kill 9 rats, it is best for you to avoid picking up any loot they drop in the hopes that a purveyor quest is coming soon. Saving the drops can allow you to build up many lootable items on the floor allowing for rapid fire completion of purveyor quests when they appear. Additionally, hold off on picking up magic quality or higher items, as those can be used for the purveyor quests associated with higher quality items. HOWEVER, eventually items do DESPAWN after a certain amount of time, so be mindful of how long you have left your loot on the floor. | ||
| + | |||
| + | |||
| + | == What is QQ and why should you consider it? == | ||
| + | |||
| + | QQ stands for Quantity and Quality. It is a method of farming that prioritizes the amount and quality of items dropped rather than the speed at which enemies can be killed. Consult this helpful [https://islebuilds.com/tools/qq page] for an in-depth look at the mechanics. | ||
| + | |||
| + | === Types of QQ Builds === | ||
| + | |||
| + | ==== Full QQ Farm === | ||
| + | The idea of this build is to cap both quality and quantity, at 286% and 200% respectively. This often leaves the build with little to no offensive power, so these are most frequently used for farming low level enemies such as [[Bunny|Bunnies]] or [[Seagull|Seagulls]]. Farming these enemies will NOT provide any idols, so this is purely a farm for augmenting materials, as well as for legendary items to craft with. This setup is likely the fastest way to farm for the [[Legendary Essence]] necessary to augment legendary quality trinkets, although fastest is relative as it is still INCREDIBLY slow to produce legendary essence. | ||
| + | |||
| + | === Late game quant setup === | ||
| + | Extremely late game builds, which can solo all content the game has to offer easily, can begin to replace some of their dpt with item quantity. This can be used to farm [[Mog'resh]] and [[Temple]] more effectively, as with max quantity mog will start dropping 5 items instead of the usual 3, and mog already has max quality built in so the player does not need to build any. Temple already has some quality built in, and item quality is much harder to build for, so players often settle for just quantity. Both mog and temple drop lvl 20 gear and runes, meaning quanting them gives the best chance for gear upgrades or powerful legendary runes. | ||
Revision as of 19:43, 14 March 2023
Advanced Guide
No Version: This article explicitly has no version. It is likely not maintained or needed enough to be always kept up to date, and everything should be considered outdated and double-checked when used if necessary.
Player Opinion: This article contains advice from other players which may be subjective or incorrect. Consult this guide with caution.
WIP: This article is a work in progress, meaning that it is being worked on but is unfinished. You can help by editing it.
This is a general guide that covers advanced tips and endgame goals and builds.
To Add in this section
- Advanced equipment explanation
- Advanced info about Rune usage
- Advanced leveling guide
- Advanced crafting (idol/mat) tips
- Fighting tips
- QQ equipment advice/explanation
Goals
Here's a list of things to work on (mainly lategame):
- Reaching level 20 (on all 3 spirits)
- Farming Stinktooth/M'ogresh/Radulos/Temple for gear
- Find/augment full legendary gear (has more rolls)
- High damage roll weapon
- High rolled runes
- Unlock Whirlwind (from Stinktooth)/Ambush (from Bera) recipes
- Farming for Putrid Shank (from Stinktooth)
- Farming for Steelclaw's Bite (from Stinktooth)
- Farming for Princess Morgawsa's Trident (from Estuary)
- Farming for Corrupted Blossom (from Temple)
- Farming for Cowl of Obscurity (from Gaekatla rep)
- Farming for Gaekatlan Druid skin (from Gaekatla rep)
- Seasonal events
- Become the strongest :D
Spirit Tips
Owl
Summon Skeleton are many times used by slightly weaker owls to help keep enemies away by distracting them. Although it is recommended to use no more than 2, so that you have alternative attacks in case you are caught off guard while summoning a skeleton.
Ice Spear can be used to deliver a quick hit thanks to its low cast time.
Fireblast can be used to keep mobs at distance for a few more ticks, allowing critical time to cast a final mm or cons to heal. It also works well when paired with Ice Spear or Smite. Owls can farm groups of enemies by coupling Fireblast with a source of healing such as Consecrate, Cowl of Obscurity, or Healing Touch.
When engaging in combat alone, a Healing Touch may be used instead of a Consecrate as it provides better hpt on single targets, although it relies the caster to be reactive towards damage taken rather than proactive, which can be more dangerous.
Owls generally use Tomes as the preferred offhand slot item because of the spell crit chance and multi implicits being more useful than the block chance implicit stat of the Shields. Some owls prefer to use shields for more armor, because owls are generally have less health and armor than other spirits. The Strength requirement on shields can sometimes be a problem though.
Bear
Bear can farm groups of enemies via AoE damage sources such as Rune of Whirlwind, Shield of Lustre, or Gourdhowl together with a source of healing such as LoH, Cowl of Obscurity or Harvest Life.
Rune of Flurry may be used in pairing with a high damage axe to deal large amounts of damage in a short period of time.
If not using an axe, bears generally use Shields as the preferred offhand slot item because of its block chance implicit stat being more useful than the Spell Crit Chance and multi implicits of the Tomes.
Lynx
Rune of Flurry may be used in pairing with a high damage spear to deal large amounts of damage in a short period of time.
Lynxes generally use Gilded Shield as the preferred offhand slot item because the armor implicit stat being more useful than the Spell Crit Chance and Multi implicits of the Tomes.
Due to how often lynx can apply damage with Smokebomb, building for crit with a Cowl of Obscurity vastly increases a lynx's durability.
List of Builds
Most builds are designed around a certain spirit and a level 20 character. Before level 20, different stats might be more important to kill mobs and level up as fast as possible so players can start working on getting the strongest endgame gear. It's probably best to focus on reaching level 20 before specializing your build.
Bear
| Slash | ||
|---|---|---|
Spirit |
Bear | |
Description |
Use flurry to deal high single target damage | |
Type |
Damage | |
| Specific Gears | Runes to use | Stat to focus on |
|
| |
Passive tree choices
Choose depending on which improves dpt more, the first tree is typically stronger due to the % of a single stat roll the nodes represent (the difference is a 3.5 chance node vs a 40 multi node, the chance node represents a little more than one max roll while the multi node represents about 1.3x of a max roll)
How to use :
The main idea is getting as much crit chance/mult, str, and physical increase to pump weapon, slash, harvest, and charge damage
- Regular axes are an option if Gourdhowl is not readily obtainable, or you can run a one-handed weapon such as a Sword or Sunsickle with Shield of Lustre
- The cowl of obscurity and harvest lifes are important survivability tools
- Whirlwind can be used as a way to clear out groups of enemies
written by Arkie for v0.11.0
| High damage flurry bear | ||
|---|---|---|
Spirit |
Bear | |
Description |
Use flurry to deal high single target damage | |
Type |
Damage | |
| Specific Gears | Runes to use | Stat to focus on |
|
| |
Passive tree choices
Choose depending on which improves dpt more, the first tree is typically stronger due to the % of a single stat roll the nodes represent (the difference is a 3.5 chance node vs a 40 multi node, the chance node represents a little more than one max roll while the multi node represents about 1.3x of a max roll)
How to use :
The main idea is getting as much crit chance/mult, str, and physical increase to pump weapon damage for flurry
- Regular axes are an option if Gourdhowl is not readily obtainable
- The cowl of obscurity is an important survivability tool
- Vitality and resistances can help you survive a flurry cast with bad rng
- Having some mana regen and using Tranquility can help alleviate the high mana cost of flurry
Flurry is NOT a consistent source of damage, so this build is abnormally reliant on rng
written by Polfy edited by Arkie for v0.11.0
| Steelclaw's Bite Bear | ||
|---|---|---|
Spirit |
Bear | |
Description |
Use the Steelclaw always crit + Harvest life to deal damage/regen hp | |
Type |
Damage / Tank | |
| Specific Gears | Runes to use | Stats to focus on |
|
| |
Passive tree choices
Choose depending on preference or on which stats you are missing (first tree is survivability focused while second tree is damage focused)
How to use :
The main idea is to both deal damage and regen hp using scb, while being tanky enough to survive your own self damage and the enemies' damage.
- Ideally 2 harvest life runes will be used, this is the perfect amount to harvest, take 2 steps, and harvest again (this is important for doing mog'resh)
- All attr is a blessing, as harvest life scales off of 0.75x the sum of int+str, meaning all attr is bascially 1.5 mainstat for the purposes of scaling damage instead of 1
- Focus on improving vit/res stats first, as they are vital to not killing yourself with scb
- Depending on if you are above/below 134% attack speed, 52/48 mana regen is the breakpoint to infinitely sustain 2 harvest lifes on cooldown, realistically you will need less as you should not be casting off cooldown too often
- Spare rune slots is ideally dedicated to either Tranquility or Innervation
written by Polfy edited by Arkie for v0.11.0
| Tank bear | ||
|---|---|---|
Spirit |
Bear | |
Description |
Max armor/resist high vit/hp regen tank | |
Type |
Tank | |
| Specific Gears | Runes to use | Stats to focus on |
|
| |
Passive tree
Pathing to multi on the tree is not particularly useful in this case, it is up to personal preference where those points should be allocated, although the attack speed can help reduce harvest life cast time from 3 ticks to 2 ticks if an additional 18% attack speed is present from gear stats
How to use :
This build is purely theoretically useful and will not be practical until the addition of a rune that can establish threat not based on damage dealt (bear attacks and runes have threat multi present on them, but that is based on damage dealt so tank bear cannot realistically take aggro)
written by Polfy edited by Arkie for v0.11.0
| Sickle Bear | ||
|---|---|---|
Spirit |
Bear | |
Description |
Necro-ish build focused on harv and sickle | |
Type |
Tank | |
| Specific Gears | Runes to use | Stats to focus on |
|
| |
Passive tree choices
Passive tree is completely up to personal preference here, just go with whatever feels best
How to use :
The main idea of this build is similar to scb bear, but instead of relying on scb to artificially inflate damage at the cost of extra levels of danger, a sickle and loh are used to increase survivability at the cost of damage (it is possible to actually outdamage scb bear because you are not limited by your own hp pool regarding how hard you can hit)
- Any regular sickle can be used if sunsickle is not readily ontainable
- High vitality is important to survive between harvest casts
- Unlike scb bear, crit can and should be squeezed into the build (res is less important on this build so sacrifice res first to put on crit)
- All attr is a blessing, as harvest life scales off of 0.75x the sum of int+str, meaning all attr is bascially 1.5 mainstat for the purposes of scaling damage instead of 1
edited by Arkie for v0.11.0
| Butcher Bear | ||
|---|---|---|
Spirit |
Bear | |
Description |
Use Steelclaw, charge, and damage from lustre and slash to kill players in a single stun | |
Type |
Damage / Tank | |
| Specific Gears | Runes to use | Stats to focus on |
|
| |
Passive tree choices
How to use :
The main idea is to both to use Steelclaw's guaranteed crit (self damage is almost irrelevant in pvp), and a long stun duration charge coupled with slashes and spikes from lustre to kill even the tankiest enemy player in a single stun.
- Pvp is determined almost entirely by whoever charges first
- Lustre spike damage bypasses spawn invulnerability, so it is possible to kill players that have respawned and are still unable to attack you back
- Some vit/armor can help you survive against a weaker butcher's combo, but ultimately building tanky is completely useless (you can have capped armor, 1500 hp, and capped res and still die in one combo from a powerful butcher)
written by Arkie for v0.11.0
Lynx
| Flurry lynx | ||
|---|---|---|
Spirit |
Lynx | |
Description |
Use flurry to deal high single target damage | |
Type |
Damage | |
| Specific Gears | Runes to use | Stats to focus on |
|
| |
Passive tree choices
Choose depending on which improves dpt more, the first tree is typically stronger due to the % of a single stat roll the nodes represent (the difference is a 3.5 chance node vs a 40 multi node, the chance node represents about 1.1x of a max roll while the multi node represents about 1.3x of a max roll)
How to use :
The main idea is getting as much crit chance/mult, dex, and physical increase to pump weapon damage for flurry
- The cowl of obscurity is an important survivability tool
- Vitality and resistances can help you survive a flurry cast with bad rng
- Having some mana regen and using Tranquility can help alleviate the high mana cost of flurry
- You can use a bow if you prefer the range over the raw damage of spear, this can also allow you to take Roll over charge for kiting purposes
Flurry is NOT a consistent source of damage, so this build is abnormally reliant on rng
written by Polfy edited by Arkie for v0.11.0
| Smokebomb Lynx | ||
|---|---|---|
Spirit |
Lynx | |
Description |
SmokeBomb spam damage | |
Type |
Damage/Area Damage | |
| Specific Gears | Runes to use | Stats to focus on |
|
| |
Passive tree
How to use :
The main idea of this build is to use the high tickrate of sb damage coupled with crits and cowl heals to stay alive and deal damage
- Cowl of Obscurity is a MUST, this build does not function without it
- About 43 mana regen is the break point for infinitely sustainable casting of sb as soon as the cooldown is finished.
- Although it may seem unintuitive, the more enemies around you the safer you actually are, as more enemies -> more crits -> more cob heals, and it is highly unlikely they will burst you fast enough to kill you
written by Polfy edited by Arkie for v0.11.0
| Ambush lynx | ||
|---|---|---|
Spirit |
Lynx | |
Description |
Use ambush to deal massive damage | |
Type |
Damage | |
| Specific Gears | Runes to use | Stats to focus on |
|
| |
Passive tree choices
Choose depending on which improves dpt more, the first tree is typically stronger due to the % of a single stat roll the nodes represent (the difference is a 3.5 chance node vs a 40 multi node, the chance node represents about 1.1x of a max roll while the multi node represents about 1.3x of a max roll)
How to use :
The main idea is getting as much crit chance/mult, dex, and physical increase to pump ambush
- Depending on the stats and the ambush runes, you mau need to crit on 2 or 3 out of 4 ambushes to kill mog'resh, so this build is almost as reliant on rng as flurry
written by Arkie for v0.11.0
Owl
| Support Steelclaw's bite owl | ||
|---|---|---|
Spirit |
Owl | |
Description |
Fast cast/Full crit heal owl | |
Type |
Healer/Support | |
| Specific Gears | Runes to use | Stats to focus on |
|
| |
Passive Tree
How to use :
The main idea is to keep you and the whole party alive by constantly ensuring that there is at least one consecrate active
- The steelclaw's bite allows for 100% crit chance but causes damage recoil. Healing with the bite, however, does not make you take damage but still makes your heals crit.
- Because the max duration of cons is less than the cooldown, you need 2 cons runes to always have one active. Perfectly casting 2 max dur (13) cons runes so that cons is always active requires 92 mana regen to be infinitely sustainable, so beg your party to run extra tranqs
- For stats, focus on multi, int, and spell/holy/elemental increase. Ignore crit chance.
- It is recommended to use 2 Tranquility runes for your party members because of the large mana cost of Consecrate. (The Sash of Souls will help maintain a high mana pool even when using multiple tranqs)
- You still get loot/exp if you heal a party member that damages a monster
edited by Arkie for v0.11.0
| Sniper owl | ||
|---|---|---|
Spirit |
Owl | |
Description |
All purpose owl | |
Type |
Ranged Damage | |
| Specific Gears | Runes to use | Stats to focus on |
|
| |
Passive tree choices'
Owl passive tree is incredibly flexible, you can change it depending on what you prefer or what matches the situation.
How to use :
The main idea of this build is to be adaptable to many situations, whether you need to deal single target damage, apply debuffs, heal, or do anything else. Owl is the jack of all trades spirit!
- This build is incredibly adaptable, with it being recommended that you dedicate some inventory space to extra runes or even extra gear pieces (rune swaps help you adapt to any situation, and you can carry some specialized equip swaps such as a full cast speed Finger or Trinket item)
- This build can vary amounts of cast speed, spell crit, intellect and mana stats based on personal choice.
edited by Arkie for v0.11.0
Additional Passive Tree Advice
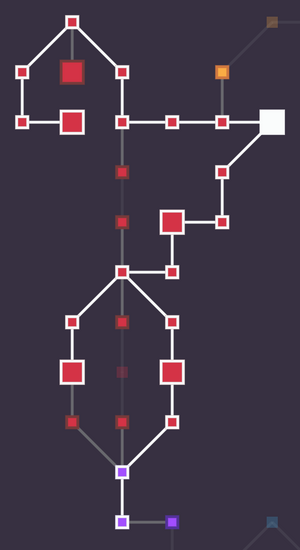
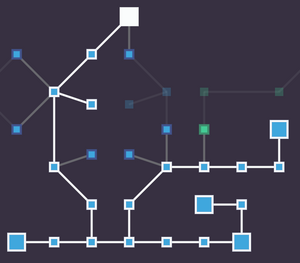
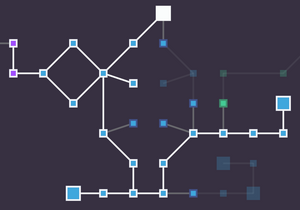
When considering where to go in the passive tree, generally the big nodes are useful to get. However, you must weigh whether they actually improve your build or even if it is worth pathing to at all. Consider these two lynx trees for example:
The first tree is an example of what a more novice player may take, because they believe the extra dex and phys incr from the small nodes on the lynx side is more benificial than spending them pathing to the multi node on the bear side. However, they fail to consider that the 1 dex nodes are not very valuable (each representing 0.1 of a max roll), and while the phys incr represents 5 max rolls, phys incr going from 60 to 75 is much less useful than an additional 100 multi, which is not slouching either at 3.3 max rolls of value (consider that when calculating damage, the phys incr would represent a change in the phys incr factor from 1.6x to 1.75x, while the multi would represent the addition of 1 to the multi factor. Assuming everything else is equal, we can consider two equations, damage = 1.6 x (multi + 1) and damage = 1.75 x multi). When solving for what multi would cause the damage to be equal, we come to the conclusion that the multi node is better until 18667 multi (INCREDIBLY unrealistic), so it is always better to take the multi node over the phys node)
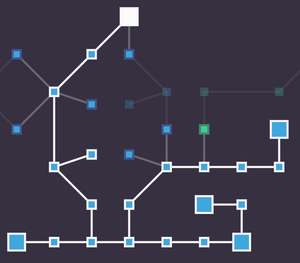
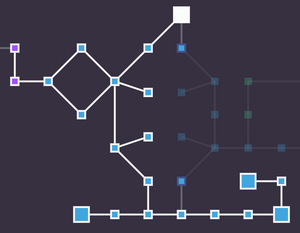
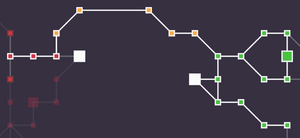
Look at the this owl passive tree for another example:
There are two possible paths in this tree for the right side, taking the upper path as shown or taking the lower path. They both result in the same ultimate goal (60 multi), but the paths there are vastly different in value. The path shown consists entirely of small nodes, which provide cast speed (which can help dpt) and int (which always helps dpt), while the alternate path includes a big node, but only provides mana regen and max mana, which does not serve to help dpt and only provides a cushion of max mana to allow lower dpt owls to cast more rotations of their runes before running out of mana.
Advanced Levelling Guide
When levelling additional characters to 20, the experience can be made much easier through proper itemization and decision making.
Itemization
In order to maximize the rate of xp gain, it is important to be able to complete quests as quickly and often as possible. The most common quest types are ones asking to loot specific categories of items (purveyor quests), so to facilitate this it is important to have as much item quant as possible. This can be done either by setting up quant items on a levelling build or by having another player using a quant build take the last hit on every enemy.
Occasionally, there will be quests asking for magic quality equipment of a specific categories or asking for any rare quality equipment. In order to facilitate this, some item quality helps immensely. You can do this again by putting it onto the levelling build itself, having an external player with it, or by killing or assisting in the killing of bosses such as Stinktooth or Radulos, which are guaranteed to drop several higher rarity items.
Decision Making
Before you start picking up your loot drops, you should ask yourself if it helps you complete your current quest. For example, if you are in sewers and have a quest to kill 9 rats, it is best for you to avoid picking up any loot they drop in the hopes that a purveyor quest is coming soon. Saving the drops can allow you to build up many lootable items on the floor allowing for rapid fire completion of purveyor quests when they appear. Additionally, hold off on picking up magic quality or higher items, as those can be used for the purveyor quests associated with higher quality items. HOWEVER, eventually items do DESPAWN after a certain amount of time, so be mindful of how long you have left your loot on the floor.
What is QQ and why should you consider it?
QQ stands for Quantity and Quality. It is a method of farming that prioritizes the amount and quality of items dropped rather than the speed at which enemies can be killed. Consult this helpful page for an in-depth look at the mechanics.
Types of QQ Builds
= Full QQ Farm
The idea of this build is to cap both quality and quantity, at 286% and 200% respectively. This often leaves the build with little to no offensive power, so these are most frequently used for farming low level enemies such as Bunnies or Seagulls. Farming these enemies will NOT provide any idols, so this is purely a farm for augmenting materials, as well as for legendary items to craft with. This setup is likely the fastest way to farm for the Legendary Essence necessary to augment legendary quality trinkets, although fastest is relative as it is still INCREDIBLY slow to produce legendary essence.
Late game quant setup
Extremely late game builds, which can solo all content the game has to offer easily, can begin to replace some of their dpt with item quantity. This can be used to farm Mog'resh and Temple more effectively, as with max quantity mog will start dropping 5 items instead of the usual 3, and mog already has max quality built in so the player does not need to build any. Temple already has some quality built in, and item quality is much harder to build for, so players often settle for just quantity. Both mog and temple drop lvl 20 gear and runes, meaning quanting them gives the best chance for gear upgrades or powerful legendary runes.
