Difference between revisions of "Getting Started"
Jump to navigation
Jump to search
(Made collapsible) |
(Made toggles unique) |
||
| Line 9: | Line 9: | ||
{{collapse|[[File:LoginEmpty.png|x100px]]|1}} | {{collapse|[[File:LoginEmpty.png|x100px]]|1}} | ||
* Enter a username and password. You should probably write these down, because if you forget them there is currently no way of recovering your account. | * Enter a username and password. You should probably write these down, because if you forget them there is currently no way of recovering your account. | ||
| − | {{collapse|[[File:LoginSample.png|x100px]]| | + | {{collapse|[[File:LoginSample.png|x100px]]|2}} |
* Press register. | * Press register. | ||
| − | {{collapse|[[File:LoginRegister.png|x100px]]| | + | {{collapse|[[File:LoginRegister.png|x100px]]|3}} |
* You should see the character selection/creation screen. If you don't see the below image, there was probably something wrong. Read the error message and try to correct what is wrong. See [[#Getting Help|Getting Help]] if you need more help. | * You should see the character selection/creation screen. If you don't see the below image, there was probably something wrong. Read the error message and try to correct what is wrong. See [[#Getting Help|Getting Help]] if you need more help. | ||
| − | {{collapse|[[File:CharacterScreenEmpty.png|x100px]]| | + | {{collapse|[[File:CharacterScreenEmpty.png|x100px]]|4}} |
* Congrats, you now have an account! | * Congrats, you now have an account! | ||
| Line 19: | Line 19: | ||
* Now that you have an account, it's time to create a character to start playing. If you followed the [[#Registering an Account|steps to register an account]] correctly you should see an empty character list. | * Now that you have an account, it's time to create a character to start playing. If you followed the [[#Registering an Account|steps to register an account]] correctly you should see an empty character list. | ||
| − | {{collapse|[[File:CharacterScreenEmpty.png|x100px]]| | + | {{collapse|[[File:CharacterScreenEmpty.png|x100px]]|5}} |
* Press the 'New' button to create a character. | * Press the 'New' button to create a character. | ||
| − | {{collapse|[[File:CharacterScreenNew.png|x100px]]| | + | {{collapse|[[File:CharacterScreenNew.png|x100px]]|6}} |
* You will see a screen with many options. | * You will see a screen with many options. | ||
| − | {{collapse|[[File:CharacterScreenNewDefault.png|x100px]]| | + | {{collapse|[[File:CharacterScreenNewDefault.png|x100px]]|7}} |
* Start by typing in a name for your first character! | * Start by typing in a name for your first character! | ||
| − | {{collapse|[[File:CharacterScreenNewName.png|x100px]]| | + | {{collapse|[[File:CharacterScreenNewName.png|x100px]]|8}} |
* Then pick a [[class]]. A list of classes can be found [[class|here]]. | * Then pick a [[class]]. A list of classes can be found [[class|here]]. | ||
| − | {{collapse|[[File:CharacterScreenNewClass.png|x100px]]| | + | {{collapse|[[File:CharacterScreenNewClass.png|x100px]]|9}} |
* If your [[class]] has [[costume|costumes]], you can pick one of those as well. Costumes are simple alternate appearances for your character. | * If your [[class]] has [[costume|costumes]], you can pick one of those as well. Costumes are simple alternate appearances for your character. | ||
| − | {{collapse|[[File:CharacterScreenCostume.png|x100px]]| | + | {{collapse|[[File:CharacterScreenCostume.png|x100px]]|10}} |
* Finally, pick your [[prophecy|prophecies]]. Prophecies are special modifications to your character, such as allowing PvP, having permadeath, or taking extra damage. For beginners it is best to start with just Titangrip which gives double stats from items. | * Finally, pick your [[prophecy|prophecies]]. Prophecies are special modifications to your character, such as allowing PvP, having permadeath, or taking extra damage. For beginners it is best to start with just Titangrip which gives double stats from items. | ||
| − | {{collapse|[[File:CharacterScreenProphecies.png|x100px]]| | + | {{collapse|[[File:CharacterScreenProphecies.png|x100px]]|11}} |
* Once you are done selecting all these things, press 'Create'. | * Once you are done selecting all these things, press 'Create'. | ||
| − | {{collapse|[[File:CharacterScreenNewCreate.png|x100px]]| | + | {{collapse|[[File:CharacterScreenNewCreate.png|x100px]]|12}} |
* After doing this, you will be dropped into the Tutorial. Good luck! | * After doing this, you will be dropped into the Tutorial. Good luck! | ||
Revision as of 18:50, 16 August 2017
WIP: This article is a work in progress, meaning that it is being worked on but is unfinished. You can help by editing it.
This is a guide on how to get started playing Isleward.
Registering an Account
- Navigate to http://play.isleward.com.
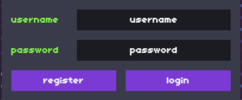
- You should see a page saying 'Isleward' with a box for username and password.
[Toggle]
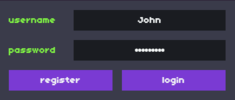
- Enter a username and password. You should probably write these down, because if you forget them there is currently no way of recovering your account.
[Toggle]
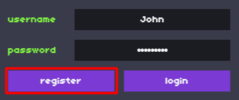
- Press register.
[Toggle]
- You should see the character selection/creation screen. If you don't see the below image, there was probably something wrong. Read the error message and try to correct what is wrong. See Getting Help if you need more help.
[Toggle]
- Congrats, you now have an account!
Creating a Character
- Now that you have an account, it's time to create a character to start playing. If you followed the steps to register an account correctly you should see an empty character list.
[Toggle]
- Press the 'New' button to create a character.
[Toggle]
- You will see a screen with many options.
[Toggle]
- Start by typing in a name for your first character!
[Toggle]
[Toggle]
- If your class has costumes, you can pick one of those as well. Costumes are simple alternate appearances for your character.
[Toggle]
- Finally, pick your prophecies. Prophecies are special modifications to your character, such as allowing PvP, having permadeath, or taking extra damage. For beginners it is best to start with just Titangrip which gives double stats from items.
[Toggle]
- Once you are done selecting all these things, press 'Create'.
[Toggle]
- After doing this, you will be dropped into the Tutorial. Good luck!
Controls
Movement
WASD or arrow keys to move. Every move you do queues up on the server and every turn you move one square down the queue. Press escape to clear your queue.
Combat
Click an entity to select hit. Press 1 to activate your automatic attack. Press 2 and 3 to activate your abilities.
Reference
| Keystroke | Function |
|---|---|
| WASD, Arrows | Movement |
| Left Click | Select |
| 1 | Activate Auto-Attack |
| 2, 3 | Use Abilities |
| I | Open Inventory |
| Escape | Close GUI, Cancel Movement |
| V | Show Nameplates |
| H | Show Help |
| J | Open Equipment |
| O | Online |
| Enter | Open Chat, Send Message |
| M | Open Augment GUI |


